Window 7 WPA2 Authentication Step-by-Step Guide
- Mouse over to Network Connection Icon on the bottom right of your desktop screen and
Click Open network and sharing center.
- Click “Manage wireless networks”

- Click “Add” then “Manually create a network profile”

- Make sure your settings are as below.
1) Verify that the Network name (SSID) is set to i-Xcess
2) Network Authentication is set to WPA2-Enterprise
3) Data Encryption is set to AES.
4) Check on “Start this connection automatically”
5) Uncheck on “Connect even if the network is not broadcasting”
6) Click on “Next” to bring you to next configuration page
- Click on “Change connection settings” to proceed with next configuration step

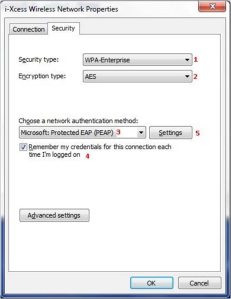
- Select the Security tab. Make your settings are as below.
1) Security type is set to WPA2-Enterprise
2) Encryption type is set to AES
3) Verify that authentication method is set to Microsoft: Protected EAP (PEAP).
4) Check “Remember my credentials for this connection each time I’m logged on
checkbox”
5) Click on Settings
- – Make sure to uncheck Validate server certificate.
– Verify that the Select Authentication Method drop-down box is set to Secured password (EAP-MSCHAP v2).
– Check “Enable Fast Reconnect”
– Uncheck “Enforce Network Access Protection”
– Uncheck “Disconnect if server does not present cryptobinding TLV”
– Uncheck “enable Identity Privacy”
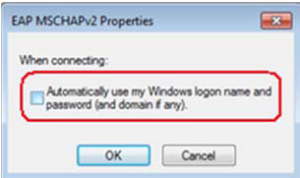
- Click the “Configure” button. Uncheck the check box labeled “Automatically use my
Windows Logon name and password (and domain if any).”
Click “Ok” or “Close”.
- Click on “Advance settings”

- Under 802.1x settings tab, Check “Specify authentication mode” and select “User authentication”, Uncheck “Enable single sign on for this network”. Click “Ok” or “Close” buttons on all the windows.

- Try connect to “i-Xcess”.

- Connect the network called “i-Xcess” and when prompted, provide your standard
studentID/password.


Thank you very much bro!
You are most welcome!
Thanks very much… Useful
you are welcome
And what is the password ? I’ve got my student id but I still dunno the password
you can check your password with divisional office
usually the password is ur date of birth..or u can refer to the divisional office
My spouse and I stumbled over here by a different web page
and thought I should check things out. I like what I see so now i’m following you. Look forward to going over your web page repeatedly.
Thanks!
Great post. I used to be checking constantly
this weblog and I am impressed! Extremely helpful info specifically the
remaining phase 🙂 I handle such info a lot.
I was seeking this particular info for a long time. Thank you
and best of luck.
Thanks for your personal marvelous posting! I seriously
enjoyed reading it, you are a great author. I will remember
to bookmark your blog and will come back later in life.
I want to encourage one to continue your great writing,
have a nice afternoon!
Thank you very much!
Hi. I’m a Taylor student. Initially my laptop is able connect to i-Xcess. But now it is connected but there is no internet access. I have tried the above steps but my laptop still can’t connect to the internet. Is there any other ways to solve this problem?